

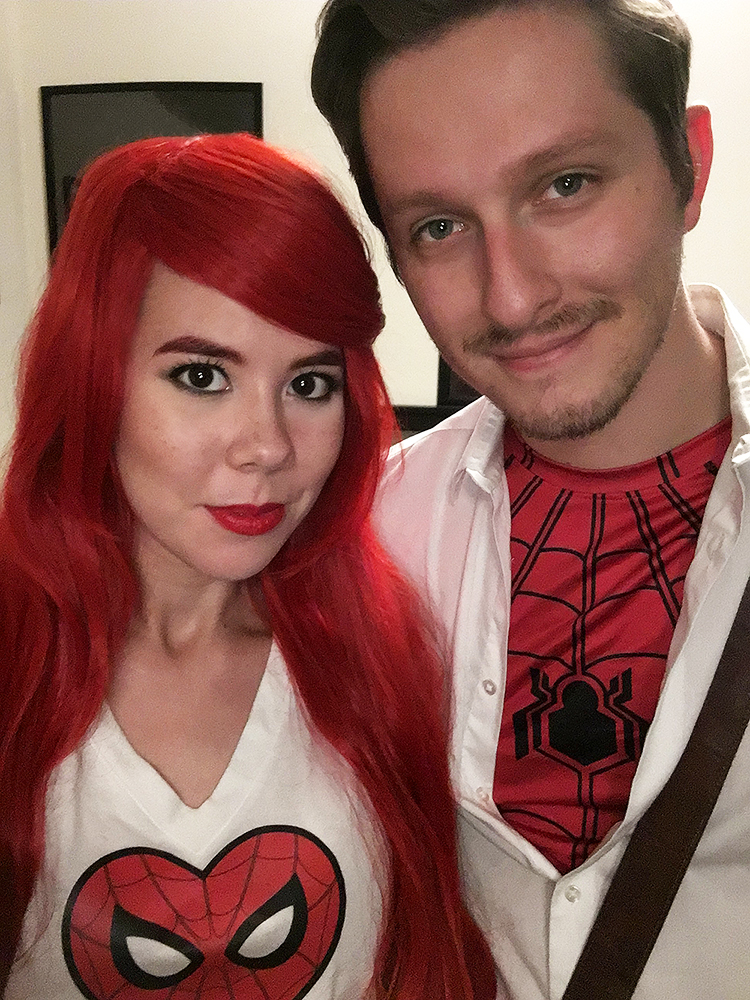
Face it, tiger…you just hit the jackpot of quick and easy cosplays! As a long-time Spider-Man fan, I’ve always wanted to cosplay the lovely ladies in Peter Parker’s life, including Gwen Stacy, Felicia Hardy’s Black Cat, and of course the infamous Mary Jane Watson. For Halloween this past year, my boyfriend and I decided last minute to dress up as Peter and MJ. I threw this whole look together in about an hour and I LOVE the way it turned out! Never in my life did I think I could ever pull off red hair, but I’m totally digging it! Read on to find out how you can recreate this super easy and fun cosplay of the webhead’s favorite redhead!

Mary Jane’s most cosplayed look is from the Amazing Spider-Man #601 cover by artist J. Scott Campbell. MJ is shown wearing ripped jeans and a low-cut white t-shirt with Spidey’s face. This look is usually combined with another drawing of Mary Jane wearing a heart-shaped Spider-Man crop top. I’ve always wanted one of these adorable Spidey heart shirts, so I decided to make my own! Here’s how you can DIY one for yourself:
DIY Spider-Man Heart Shirt

- I didn’t have time to make my own, so found the heart graphic here and here. Choose whichever design you prefer. I downloaded the image and scaled it down in a Word document to the exact size I wanted. Depending on your shirt size, you may want to make the image smaller or larger.
- Print the image on an iron-on transfer paper. You can find this at any Target, Wal-Mart or office supply store. If you’re like me and don’t have a printer (isn’t everything digital these days?), you can go to your local printing shop that carries iron-on transfer paper. I got this printed for $2.
- Cut out the heart design. Try to cut as close to the design as possible because any of the leftover white edges will be noticeable on the shirt.

- Get a white shirt. You can use a regular t-shirt, crop top, whatever you want. I happened to already have this cheap Forever 21 v-neck sitting in my dresser.
- Be sure to read the instructions for your iron-on transfer paper. Iron on a flat, hard surface, not a padded ironing board. You may want to separate the sides of the shirt by placing a piece of cardboard or a paper bag inside.
- Place your design face-down on the shirt.

- Have your iron set to the highest setting without steam. Place a piece of paper or thin cloth over the design before you iron over it. Make sure to keep pressure on it and keep the iron moving. Iron for about 3 minutes, or until the edges have stuck to the shirt.
- Let the design cool for a few minutes then peel off the white part.

Voila, you’re all done! Isn’t this shirt so cute?? I already want to make another one! Maybe I’ll actually make it a crop top next time.
I was surprised at how small the design looked when the shirt was laid flat. But when I put the shirt on, it looked perfect! Exactly the size I wanted it. Keep this in mind when you’re trying to decide how big to print your design. My shirt fit pretty loose, and I wanted it tighter around my waist like MJ is wearing. So I tied a knot in the back of my shirt and tucked it under. Easy fix!
Red Wig
You can’t be Mary Jane without the red hair! My sister let me borrow this long, wavy red wig (from Amazon) that she’s used for Ariel cosplays. You can find the wig I used as well as a couple other options below. If I do this cosplay again, I may experiment with another red wig.
Jeans
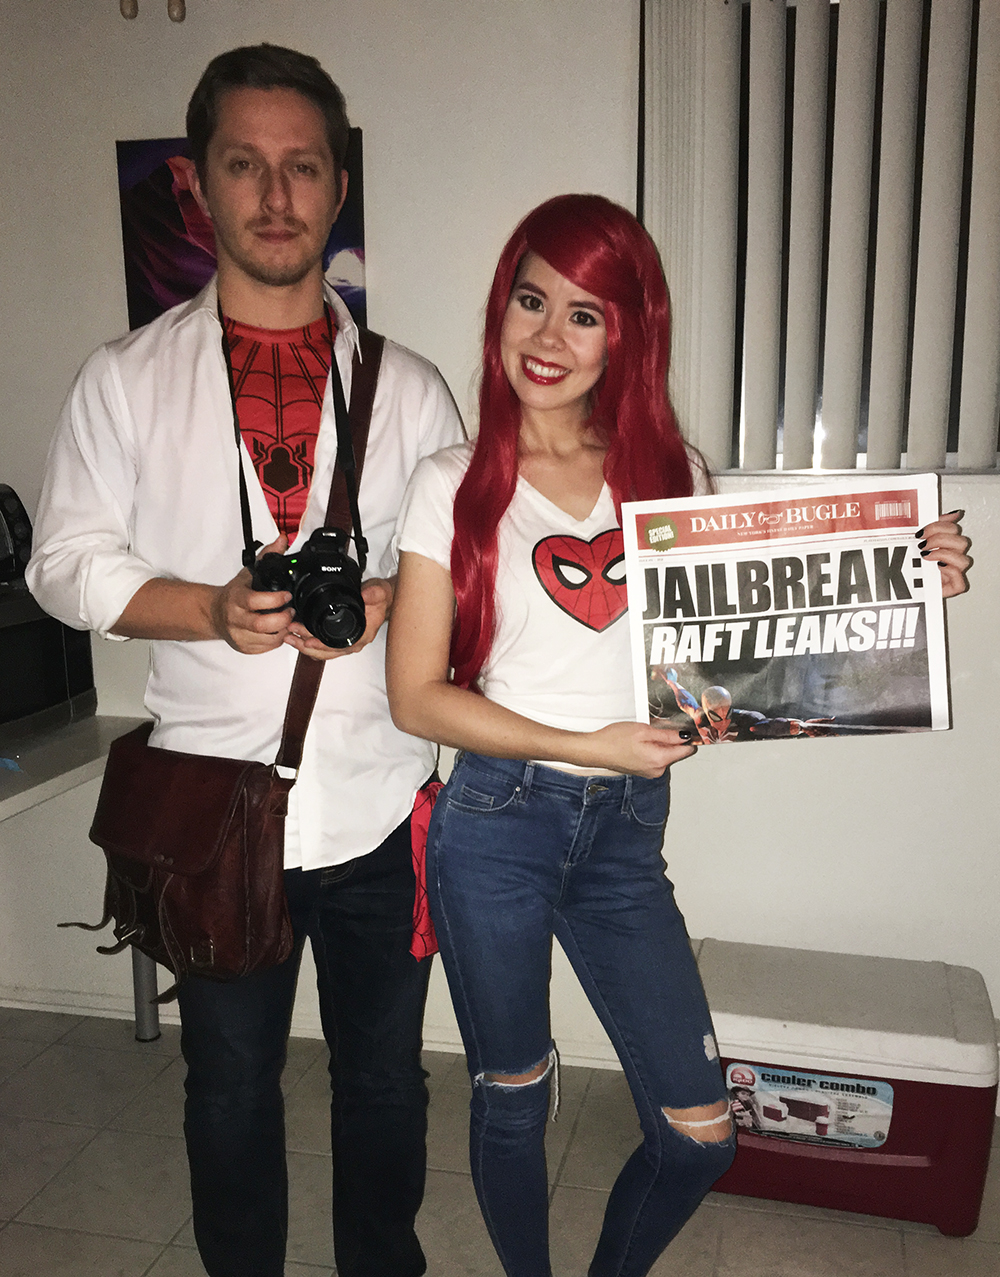
In the J. Scott Campbell cover, MJ wears a pair of ripped jeans. Should be easy enough for you to find! I used ripped Topshop Leigh jeans that I already had in my closet.
Makeup

Face: e.l.f. Flawless Finish Foundation (Listed on my Top 10 Best E.L.F. Products Post), Maybelline Dream Lumi Touch Highlighting Concealer, and Tarteist Pro Glow Highlight and Contour Palette
Brows: I used a NYX lip liner pencil (I told you it was a last-minute cosplay) to add a little red to my brows.
Eyes: Urban Decay Eye Shadow Primer, Naked 2 Palette, and NYX Matte Liquid Liner in Black Noir.
Lashes: I don’t have any false lashes, so to make my natural ones as bold as possible, I used e.l.f’s Mascara Primer (Top 10 Best E.L.F. Products), two coats of L’Oréal Voluminous Lash Paradise Mascara, and an eyelash curler.
Lips: I felt like going for a red lip, so I used Lip Sense in the color Blue Red.
Finally, I added some little freckles around my nose and cheeks using an Ulta Eye Liner Pencil in color Black Brown. And I always set my makeup with Urban Decay All-Nighter Setting Spray.
Final Look
My sister and I were late for a party, so we did this quick photo shoot in under 3 minutes using our iPhones. If we had more time, I would’ve made sure we were a little more accurate to the photo, but I’m still so happy with how the photos turned out!


And here are some photos and me and my boyfriend as Peter and MJ <3.

This was a super easy, fun cosplay, and probably my favorite one I’ve ever done so far! Hope you’ve enjoyed this tutorial and found it helpful. If you try out this Mary Jane cosplay, I’d love to see and hear about it in the comments!
XOXO, Melissa
